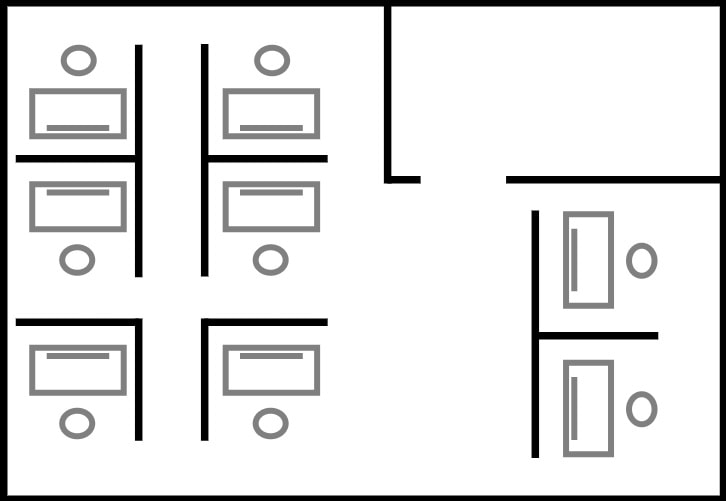
During the Corona pandemic, many companies and employees discovered home office. As a result, it became apparent that not every employee required his own workstation. Instead, companies now offer a shared desk model. This means that employees flexibly share workstations. Often, you can reserve your desired workstation in advance. This workplace booking function has attracted me for some time. I find the possibility to create a Custom Reactive Form in Angular, which also includes an office plan, particularly interesting. In the Custom Angular Reactive SVG Form there is the possibility to select a workstation from the office plan and to mark it with a color. As soon as a workstation has been chosen, the form will be validated and the desk will be bookable. In the following the implementation is explained step by step.
This might also be interesting for you: How to build an Angular PUSH architecture.
List of components
- Development environment (e.g. VS Code)
- Angular CLI
- SVG File
Creation of an office plan

I would almost say that creating the office plan was the hardest part of the task. The office plan can be created in different ways. The important thing is it has to be an SVG file. I used Adobe Xd and worked with lines, rectangles and circles. The result could be prettier, but it is enough to demonstrate the functionality. You can use my plan or create your own.
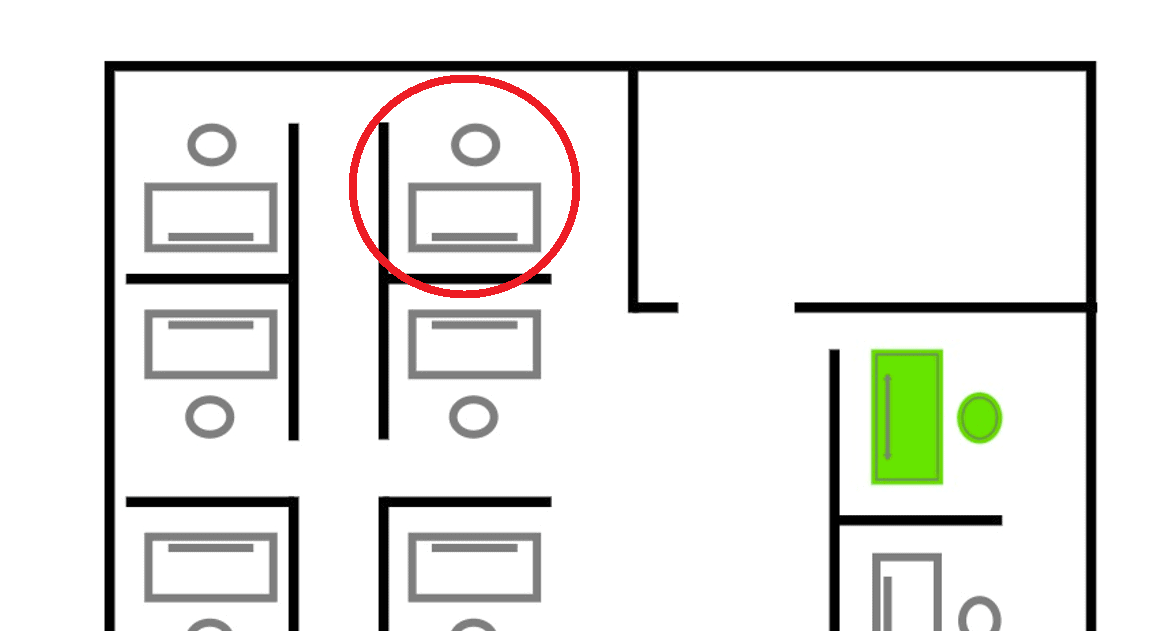
After the SVG image is created, the areas that represent a workspace need to be grouped together. I assigned the class “seat” to the group. It looks like this:
<g class="seat" >
    <g id="table-0" transform="translate(19 59)">
      <rect width="66" height="35" stroke="none" />
      <rect x="2.5" y="2.5" width="61" height="30" fill="none" />
    </g>
    <g id="screen-0" transform="translate(31 84)">
      <rect id="fill" width="42" height="4" stroke="none" />
      <path
        d="M0,1.5h42M39.5,0v4M42,2.5h-42M2.5,4v-4"
        fill="none"
        clip-path="url(#clip)"
      />
    </g>
    <g id="chair-0" transform="translate(40 30)">
      <ellipse cx="12.5" cy="11" rx="12.5" ry="11" stroke="none" />
      <ellipse cx="12.5" cy="11" rx="10" ry="8.5" fill="none" />
    </g>
  </g>
The code snippet shown corresponds to a workstation, such as the one in the red circle here:

Creation of the Angular Reactive Form
To include the office plan in a reactive form, we create a new Angular project. I took inspiration for the project from the German YouTuber Unleashed Design: https://www.youtube.com/watch?v=NOuVxP7FxBc. In general, I can highly recommend his videos! You always learn new tips and tricks, especially when dealing with Angular.
We need the ReactiveFormsModule for the Reactive Angular Form SVG. Then we create a FormGroup and FormControl fields. I have named the FormGroup reservationForm. It contains a field for the name, a field for the weekday and a field for the place you want to book.
public reservationForm: FormGroup = new FormGroup({
    name: new FormControl('', [Validators.required], []),

    weekday: new FormControl('', [Validators.required], []),

    seat: new FormControl('', [Validators.required], []),
  });
To be able to display the form some html code is necessary:
<form [formGroup]="reservationForm">
  <label for="name"> Your name:</label>
  <input id="name" type="text" formControlName="name" placeholder="Name" />

  <label for="weekday"> Enter the reservation day:</label>
  <input
    id="weekday"
    type="text"
    formControlName="weekday"
    placeholder="Monday"
  />
</form>
For a better demonstration, it makes sense to also display the value of the form:
<p>Values: {{ reservationForm.value | json }}</p>
<p>Form valid: {{ reservationForm.valid }}</p>
Making Seats Component for the Custom Angular Reactive SVG Form
To build a custom form field, the first thing we need is a new component. Here we can directly use a tip from Unleashed Design. Angular offers the possibility to include SVG images as templateUrl. We delete the seats.component.html and replace it with our SVG office plan named seats.component.svg. In the seats.component.ts we can replace the templateUrl with the SVG file:
selector: 'app-seats',
templateUrl: './seats.component.svg',
styleUrls: ['./seats.component.sass'],
The custom form field can now be included in the reactive form:
<app-seats id="seat" formControlName="seat"></app-seats>
In the Sass file, the SVG office plan can be customized as desired. Colors, line thicknesses, and much more can be set here. I have customized it so that the office plan turns red when the SVG form field is invalidated:
$successColour: #19e619

:host
    &.ng-touched, &.ng-dirty
            &.ng-invalid
                svg
                    .wall, .seat
                        stroke: red

    svg
        margin: 25px 0 25px 0

        .wall
            stroke: black
            fill: #fff
            stroke-width: 5
        .separators
            stroke: black
            fill: none
            stroke-width: 5
        .separate-room
            stroke: black
            fill: none
            stroke-width: 5

        .seat
            stroke: grey
            cursor: pointer
            fill: #fff
            transition: all 250ms
            stroke-width: 4
            &.selected
                fill: $successColour
                stroke-width: 1
Adding the ControlValueAccessor
We can already see our office plan in the Reactive Form, but it is still without functionality. To change that a ControlValueAccessor is needed. The ControlValueAccessor serves as an interface for a custom form control that integrates with Angular forms. The ControlValueAccessor asks for these four methods:
interface ControlValueAccessor {
  writeValue(obj: any): void
  registerOnChange(fn: any): void
  registerOnTouched(fn: any): void
  setDisabledState(isDisabled: boolean)?: void
}
More information about the ControlValueAccessor can be found in the doc: https://angular.io/api/forms/ControlValueAccessor
In order for the seats.component.ts component to get access to the VALUE_ACCESSOR we need to configure the following provider:
providers: [
    {
      provide: NG_VALUE_ACCESSOR,
      useExisting: forwardRef(() => SeatsComponent),
      multi: true,
    },
  ],
Variables and methods for the Angular Forms ControlValueAccessor
The next step looks more complicated than it actually is. Basically, these are fixed variables and methods that every custom form field needs.
Every custom reactive form needs the following variables. The variable onTouched, in order for the form field to become touched later. Also onChange and the static variable touched as a boolean to know if the form field is already touched. A form field can also be disabled, so the static variable isDisabled is also required as a boolean. Of course every custom form also uses a value.
public onTouched = () => {};
public onChange = (value: string) => {};
public touched: boolean = false;
public isDisabled: boolean = false;
public value: string = '';
Every Custom Reactive Form also needs the possibility to change these variables. This is where the ControlValueAccessor methods discussed in the previous section come into play. One is the writeValue function, which sets the value variable to a new value. The markAsTouched function calls onTouched and sets the variable touched to true if the custom form field has not been clicked before. Finally, the two methods registerOnChange and registerOnTouched are needed. Both actually only update their respective value. The registerOnChange function updates the value onChange and registerOnTouched updates the value onTouched. The reactiveFormModule can also disable entire forms. To ensure that the custom reactive form field also listens to this, the setDisabledState method is used. With this method the variable isDisabled can be changed.
writeValue(value: string): void {
  this.value = value;
}
markAsTouched(): void {
  if (!this.touched) {
    this.onTouched();
    this.touched = true;
  }
}
registerOnChange(onChange: any): void {
  this.onChange = onChange;
}
registerOnTouched(onTouched: any): void {
  this.onTouched = onTouched;
}

setDisabledState(isDisabled: boolean): void {
  this.isDisabled = isDisabled;
}
Bind SVG groups to the form variables
In order for the SVG office plan to be functionally usable, we still need the possibility to select individual workstations. For this we use the Angular binding possibilities. A function isSelected() is required to detect and change the sytling of the workstation.
[class.selected]="isSelected('seat-0')"
(click)="select('seat-0')"
Also a function select(), which recognizes the selected seat of the Custom Angular Reactive SVG Form by the name (“seat-1”, “seat-2″…). Within this select() function it is first checked if the form is disabled in general. If this is not the case, a second query checks if the seat has already been selected. If this is the case the value becomes nothing, otherwise the value becomes the name of the seat, for example “seat-3”.
public select(option: string): void {
  if (!this.isDisabled) {
    if (this.isSelected(option)) {
      this.value = '';
    } else {
      this.value = option;
    }
    this.onChange(this.value);
    this.markAsTouched();
  }
}

public isSelected(option: string): boolean {
  return option === this.value;
}


One thought on “How to build a Custom Angular Reactive SVG Form with clickable elements”