

There are many different ways to control the speed of a fan. For example, if your fan has a PWM wire, then you could directly use the PWM signal. Also see our other post for an Arduino fan controller with a Bluetooth Android app.
In this post we show you how to regulate the rotational speed of any fan. It doesn’t matter if your fan needs 12 Volt or 5 Volt. Also the number of wires is not important. You can use a 3, 4 or 2 wire fan! We only work with the + and – wire of your fan.
The Arduino supports 5 Volt directly. In our case we use an old PC fan with 12 Volt, so an external 12 Volt power supply is necessary.
List of components
- Arudino Mega
- Breadboard
- 12V power supply
- 12V fan
- Jumper cable
- 220 Ohm resistor
- NPN Transistor number: BC546B D6
Wiring

For the wiring we proceed according to the sketch . The 12V power supply is connected to the breadboard. We connect the – of the breadboard with GND of the Arduino (the short blue cable connection). Then the + of the breadboard to Vin of the Arduino Mega (red cable between Arduino and breadboard).
If we would plug the 12V power supply into the socket now. Then our Arduino would already be powered. There is no additional power supply like USB required. The Vin pin of the Arduino automatically regulates the 12V of the power supply to 5V for the Arduino.
Now we plug the NPN transistor into the breadboard. We connect the base (B) to the 220 Ohm resistor and then to pin 13 (yellow connection in the picture). We connect the collector (C) of the transistor directly to the negative connection of the fan (black fan cable). The positive fan connector is connected to the + of the breadboard. We connect the emitter (E) of the transistor to the – of the breadboard. That’s all for the wiring! Time for the Arduino code!
The code for the Arduino fan controller
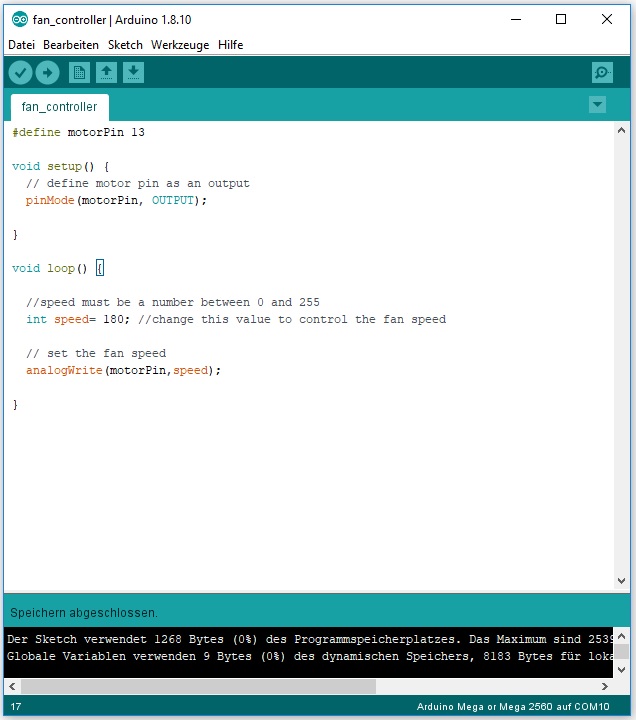
The Arduino code is absolutely simple and can be easily integrated into any existing Arduino program. Since we have connected the base of the transistor to pin 13, we define it as “motorPin”. The speed of the fan can then be controlled via the “speed” variable. A value between 0 and 255 must be selected for the speed. Depending on the fan model, a minimum speed is necessary for the fan to start.


You cover more helpful information than I can read elsewhere. I appreciate your technical experience!
This is nicely broken down and helpful, thank you! I appreciate how you touch on points without waffling on. It’s great information and I find you worth following.
I couldn’t resist commenting. Very well written!
Good day! I could have sworn I’ve been to this website before but after reading through some of the post I realized it’s new to me. Anyways, I’m definitely happy I found it and I’ll be bookmarking and checking back frequently!
Wont using a transistor cause a lot of motor whine noise?
Thank you for the post, helped a lot!