

We have already created a post in which we explain how to regulate fans by voltage. It doesn’t matter whether the fan is supplied with 12V or 5V. The number of connections is also unimportant. You only need the + and – of the fan. Now we also want to connect a Bluetooth module to the Arduino and write an app that can be used to change the speed of the fan. So let’s get started with the Android Bluetooth classic App for Arduino.
List of components
- Arudino Mega
- Breadboard
- 12V power supply
- 12V fan
- jumper cable
- 220 Ohm resistor
- NPN Transistor number: BC546B D6
- Bluetooth module HC-05 or HC-06

Wiring

For the wiring, we proceed analogously to our “fan control” post. The 12V power supply must be connected to the breadboard. We connect this – of the breadboard with GND of the Arduino (the short blue cable connection in the picture). Then we connect the + of the breadboard to Vin of the Arduino Mega (red cable between Arduino and breadboard).
If we would plug the 12V power supply into the socket now. Then our Arduino would already be powered. There is no additional power supply like USB required. The Vin pin of the Arduino automatically regulates the 12V of the power supply to 5V for the Arduino.
Now we plug the NPN transistor into the breadboard. We connect the base (B) to the 220 Ohm resistor and then to pin 13 (yellow connection in the picture). We connect the collector (C) of the transistor directly to the negative connection of the fan (black fan cable). The positive fan connector is connected to the + of the breadboard. We connect the emitter (E) of the transistor to the – of the breadboard.
In addition to these already known steps, we take the Bluetooth module and connect the ground of the module to the ground of the Arduino (black cable). VCC of the module must be connected to 3.3V of the Arduino (red connection). If there is no 3.3V connection, the 5V connection can also be used. TX of the Bluetooth module has to be connected to RX of the Arduino (orange cable). RX of the module has to be connected to TX of the Arduino (purple cable). This means TX to RX and RX to TX. Always the equivalent!
Important: While the Arduino code is being flashed on the Arduino, you have to unplug RX and TX. Otherwise the flash process won’t work!
Programming the Android Bluetooth classic app for Arduino
We program a pure Android app with an HC-05 or alternatively HC-06 Bluetooth module. These two are Bluetooth Classic Modules. You can not connect to Bluetooth 4.0 also called Bluetooth Low Energy (BLE). The code for BLE is very different. Below is the programming guide for a Bluetooth Android app build with Xamarin Android. All important files are also uploaded!
As development environment we use Visual Studio (it is free) for the Xamarin.Android app. In AndroidStudio, the process is analogous, but the code will be in Java and not in C#.
Click on “Create new project” and select “Android app (Xamarin)”. At First we add the Bluetooth permissions to the “AndroidManifest.xml” file:
<uses-permission android: name = "android.permission.BLUETOOTH" />
<uses-permission android: name = "android.permission.BLUETOOTH_ADMIN" />
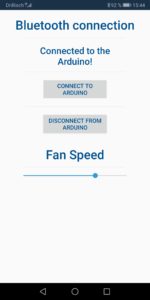
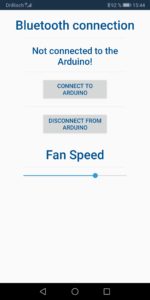
Then we design the layout of the app in the “activity_main.xml” file. We need 2 buttons for “Connect” and “Disconnect” and a slider for speed control. For the slider we set the maximum value to 127 (android: max = “127”).
In “MainActivity.cs” we add “using Android.Bluetooth”, create a “BluetoothConnection” class and set our “activity_main.xml” file as the start page. A Bluetooth socket is created for the connection to the Arduino. We recommend to look at the source code which is attached to this post.
Essentially, we always send a byte to the Arduino. That means we can send numbers between 0 and 255. For the fan control, we take the range from 0 to 127. The Arduino doubles this value and thus regulates the fan, which also runs in a range between 0 and 255. The rest of the range between 128 and 255 can be used for further functions. That’s it, just compile the app and go to the next step!
Incidentally, the code for the app is based on this project here: https://www.instructables.com/id/3-LED-Backlight-Xamarin-and-Arduino-With-HC05/
Arduino Code

#define motorPin 13
int received; //for the received Byte
int fanSpeed = 127; //initial speed - must be a number between 0 and 255
void setup() {
  Serial.begin(9600); //for communication with the app
  delay(3000); // small delay
  pinMode(motorPin, OUTPUT); //define motor pin as output
  analogWrite(motorPin,fanSpeed); //set the initial speed of the fan
}
void loop() {
  while(Serial.available())
  {
     received = Serial.read(); //received Byte
     Serial.println(received); //if the arduino is connected to the PC, than you can check the received Byte
     switch (received)  //you can easily add new cases to customize your arduino
     {
        case 200:
            Serial.println("RESTARTED");
            break;
        default:
            if(received >0 && received <=127)
            {
              fanSpeed = (received*2); //app sends value between 0 and 127 - so we need to double it for the fan range between 0 and 255
              delay(10);
            }
            break;
     }
  }
  analogWrite(motorPin,fanSpeed); //set the speed of the fan
}
Please do not forget to disconnect the RX and TX wires before flashing the Arduino and afterwards connect it again correctly (RX to TX and TX to RX)!
Since we have connected the base of the transistor to pin 13, we define it as “motorPin”. The fan speed can be controlled via the “fanSpeed” variable. At the beginning, we set “fanSpeed” to half the speed, i.e. 127. (Depending on the fan model, a certain minimum speed is necessary for the fan to start.)
We define a variable “received” in which we store the byte sent from the app. In the setup function we start the communication with “Serial.begin” and set the baud rate to 9600. Then we program a while loop in the loop function. The while loop becomes active whenever a byte is received. If the value of the byte is between 0 and 127, we double it and define it as our new fan speed “fanSpeed”. As soon as the while loop has ended, the new speed for the fan is set with “analogWrite (motorPin, fanSpeed);”
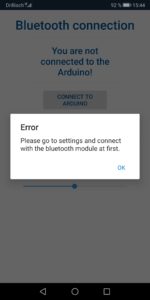
Screenshots of the Android Bluetooth classic App for Arduino
Please note, you have to go to the settings and connect to the Bluetooth module at first. Otherwise you won’t be able to connect to the Arduino with the app!


Thanks so much. I really appreciate your work but i need one more help from you. How to turn on LEDs from the app
U can do it by:
Btn.ledOn+= ()
{
int a = 1;
byte aa = Convert.ToByte(a);
myConnection.thisSocket.OutputStream.WriteByte(Convert.ToByte(a)); // send 1 to arduino
}
Btn.ledOff+=
{
int b = 0;
byte bb = Convert.ToByte(b);
myConnection.thisSocket.OutputStream.WriteByte(Convert.ToByte(b)); // send 0 to arduino
}
then in arduino code u can read it by:
while(Esp_BT.available())
{
int received =Esp_BT.read();
Serial.println(received);
if(received ==0) //
{
Serial.println(“Disconnect”);
digitalWrite(led_b,LOW);
}
if(received==1) //100
{
Serial.println(“LED is ON !”);
digitalWrite(led_b,HIGH);
}
}
is it possible you send me the apk for the project?
my email is: jankoos1800@gmail.com
greetings jan
Thank you for this simple, straightforward, and VERY useful post!
Is there any Bluetooth plugin required by Xamarin?