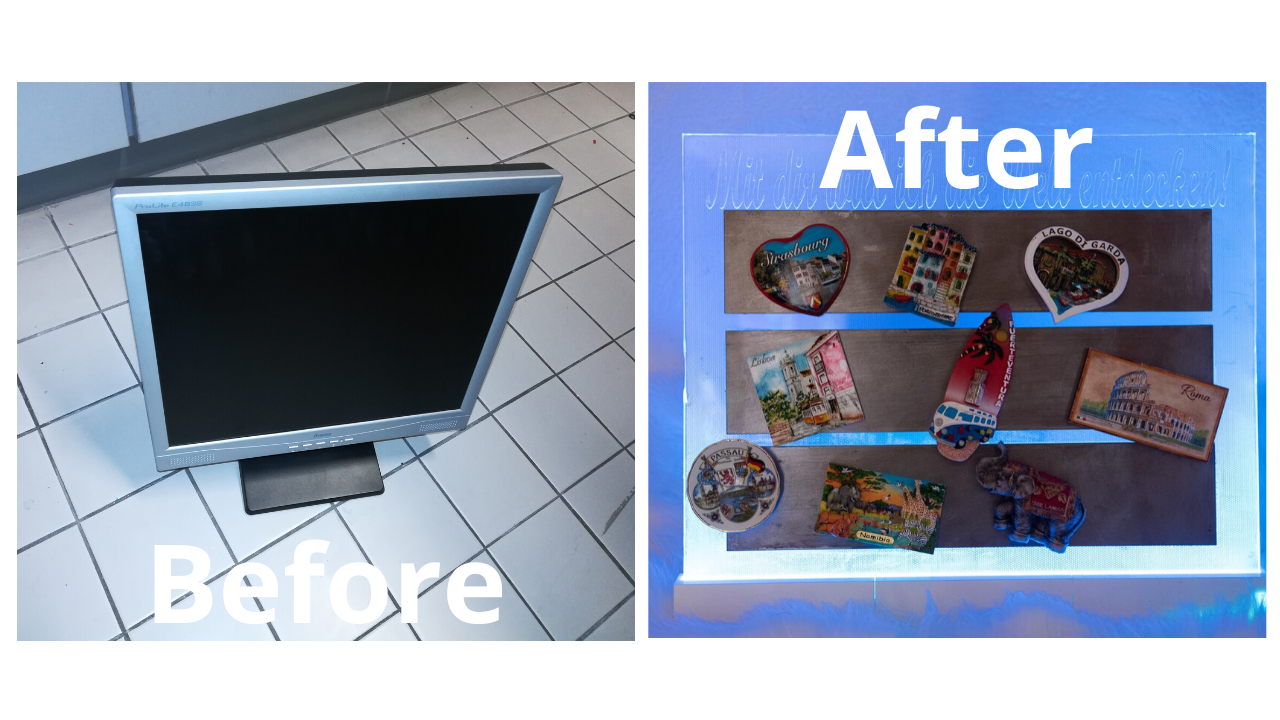
The criticism of our throw-away society is particularly great these days. Especially electronics are developing so rapidly that many devices are only used for a short time. However, a rethink has already started in some areas. The trend is towards sustainability. You can still work with useful parts from an old PC screen. We saved a discarded TFT LCD screen from the trash and made a beautiful magnetic wall out of it. With this step by step guide you can easily transform your own old PC screen to a unique magnetic wall.
List of components to transform an old PC screen to a magnetic wall
- Old PC screen
- LED strip with remote control
- Epoxy glue 30 minutes
- Hot glue gun
- Soldering iron and tin solder
- Tools
Step 1 – Disassembling the PC screen
The screen is very compact. First, the screws on the back should be loosened. Then you can start to dismantle the frame. It is best to use a screwdriver to detach the frame from the socket. Once that’s done, the speakers are exposed. Never throw them away. The speakers can be recycled for other electronic projects! There is another casing under the plastic frame. Here you also have to loosen the screws to remove the casing. Now cut the connections to the board and you can expose the individual display layers. For the following steps, we only use the glass plate, because it is highly suitable for scattering light.
Step 2 – Cutting of the edges
The second step is to saw off and polish the salient parts of the glass plate with sandpaper. If you have the opportunity to fix the glass plate, it will make your work much easier. After sawing off the protruding corners, the edges of the glass pane are sanded to obtain a smooth surface. At the end of the procedure, the edges are deburred with a cutter knife.
Step 3 – Preparing the metal
Of course we need metal for a magnetic wall. Otherwise the magnets wouldn’t stick on the wall. We therefore got 3 metal pieces of the same size, which will later be glued to the glass plate. So that the metal adheres well and because it is already rusting slightly, we brushed it and polished the edges with sandpaper.
Step 4 – Gluing the metal
Now the 3 pieces of metal are prepared for gluing. The 2 component adhesive must be mixed in a ratio of 1: 1. A fine balance helps to check the mixing ratio. You should hurry, because the adhesive will harden after 30 minutes. A magnet is also glued to the back of the LED remote control. This means that the remote control won’t get lost easily. When gluing the metal pieces to the glass plate, you should check the distances to make sure that they are equal.
Optional – Design your own stands
The easiest way is to download the 3d printing files for the stands from this post. But you can also try to design your own stand like we did it. You find a step by step guide on how to design a stand with SolidWorks in this video tutorial. You can find the full SolidWorks Tutorial here.
Step 5 – Inserting the LED strip
In the last step, the LED strip is threaded into the legs, soldered and glued. The stands were created in a 3D printer. The files for printing can be found at the end of the blog post in the “Download files” section. If you don’t have a 3D printer at home, you can have your pillars printed cheaply online.
When threading the LED strip, you have to work carefully so that the LED strip won’t get damaged. This can happen very quickly. The connections are soldered and glued to the inside of the stands.
Optional – Engraving something
To give the magnetic wall the finishing touch, you can engrave something by a specialist company. There are no limits to the imagination and the result is really impressive:


One thought on “How to transform old PC screen to beautiful magnetic wall”